NVIDIA Quantum Secure Gateway
As the quantum era approaches, the need for cryptographic systems that can withstand the power of quantum computing becomes increasingly urgent. Current key exchange mechanisms like Elliptic Curve Diffie-Hellman (ECDH) are vulnerable to attacks from quantum computers, which can easily break these algorithms. To address this looming threat, it is critical to incorporate post-quantum key exchanges alongside traditional methods like (EC)DH to ensure that the resulting shared keys are secure against quantum-based attacks. RFC 9370 provides a framework for enhancing the Internet Key Exchange (IKEv2) protocol by enabling multiple successive key exchanges, including Post-Quantum Cryptography (PQC) techniques. This allows for the seamless integration of quantum-resistant algorithms with existing cryptographic protocols, ensuring compatibility while significantly strengthening security. The derived IKEv2 keys, fortified with these advanced techniques, are thus designed to be robust against the unprecedented capabilities of quantum computers.
Qrypt integrated the BLAST protocol and post-quantum algorithms in IKEv2 as additional key exchange methods, providing security against Harvest Now Decrypt Later (HNDL) attacks and future quantum attacks. This solution, is built as an IPsec plug-in that seamlessly combines existing classical and quantum-secure key exchanges with Qrypt’s BLAST protocol. The solution leverages the NVIDIA Bluefield-3 DPU’s hardware capability for secure network communication and optimized performance. Support for the Qrypt plug-in can be easily enabled by configuring the StrongSwan service running on the DPUs.
Quick Recap of IKEv2
- IKE_SA_INIT: Communication using IKE always begins with IKE_SA_INIT and IKE_AUTH exchanges. The first pair of messages (IKE_SA_INIT) negotiate cryptographic algorithms, exchange nonces, and do a Diffie-Hellman exchange.
- IKE_AUTH: The second pair of messages (IKE_AUTH) authenticate the previous messages, exchange identities and certificates, and establish the first Child SA. Parts of these messages are encrypted and integrity protected with keys established through the IKE_SA_INIT exchange, so the identities are hidden from eavesdroppers and all fields in all the messages are authenticated.
- CREATE_CHILD_SA: All messages following the initial exchange are cryptographically protected using the cryptographic algorithms and keys negotiated in the IKE_SA_INIT exchange. At this point in the negotiation, each party can generate a quantity called SKEYSEED, from which all keys are derived for the IKE SA. The messages that follow are encrypted and integrity protected in their entirety, with the exception of the message headers.
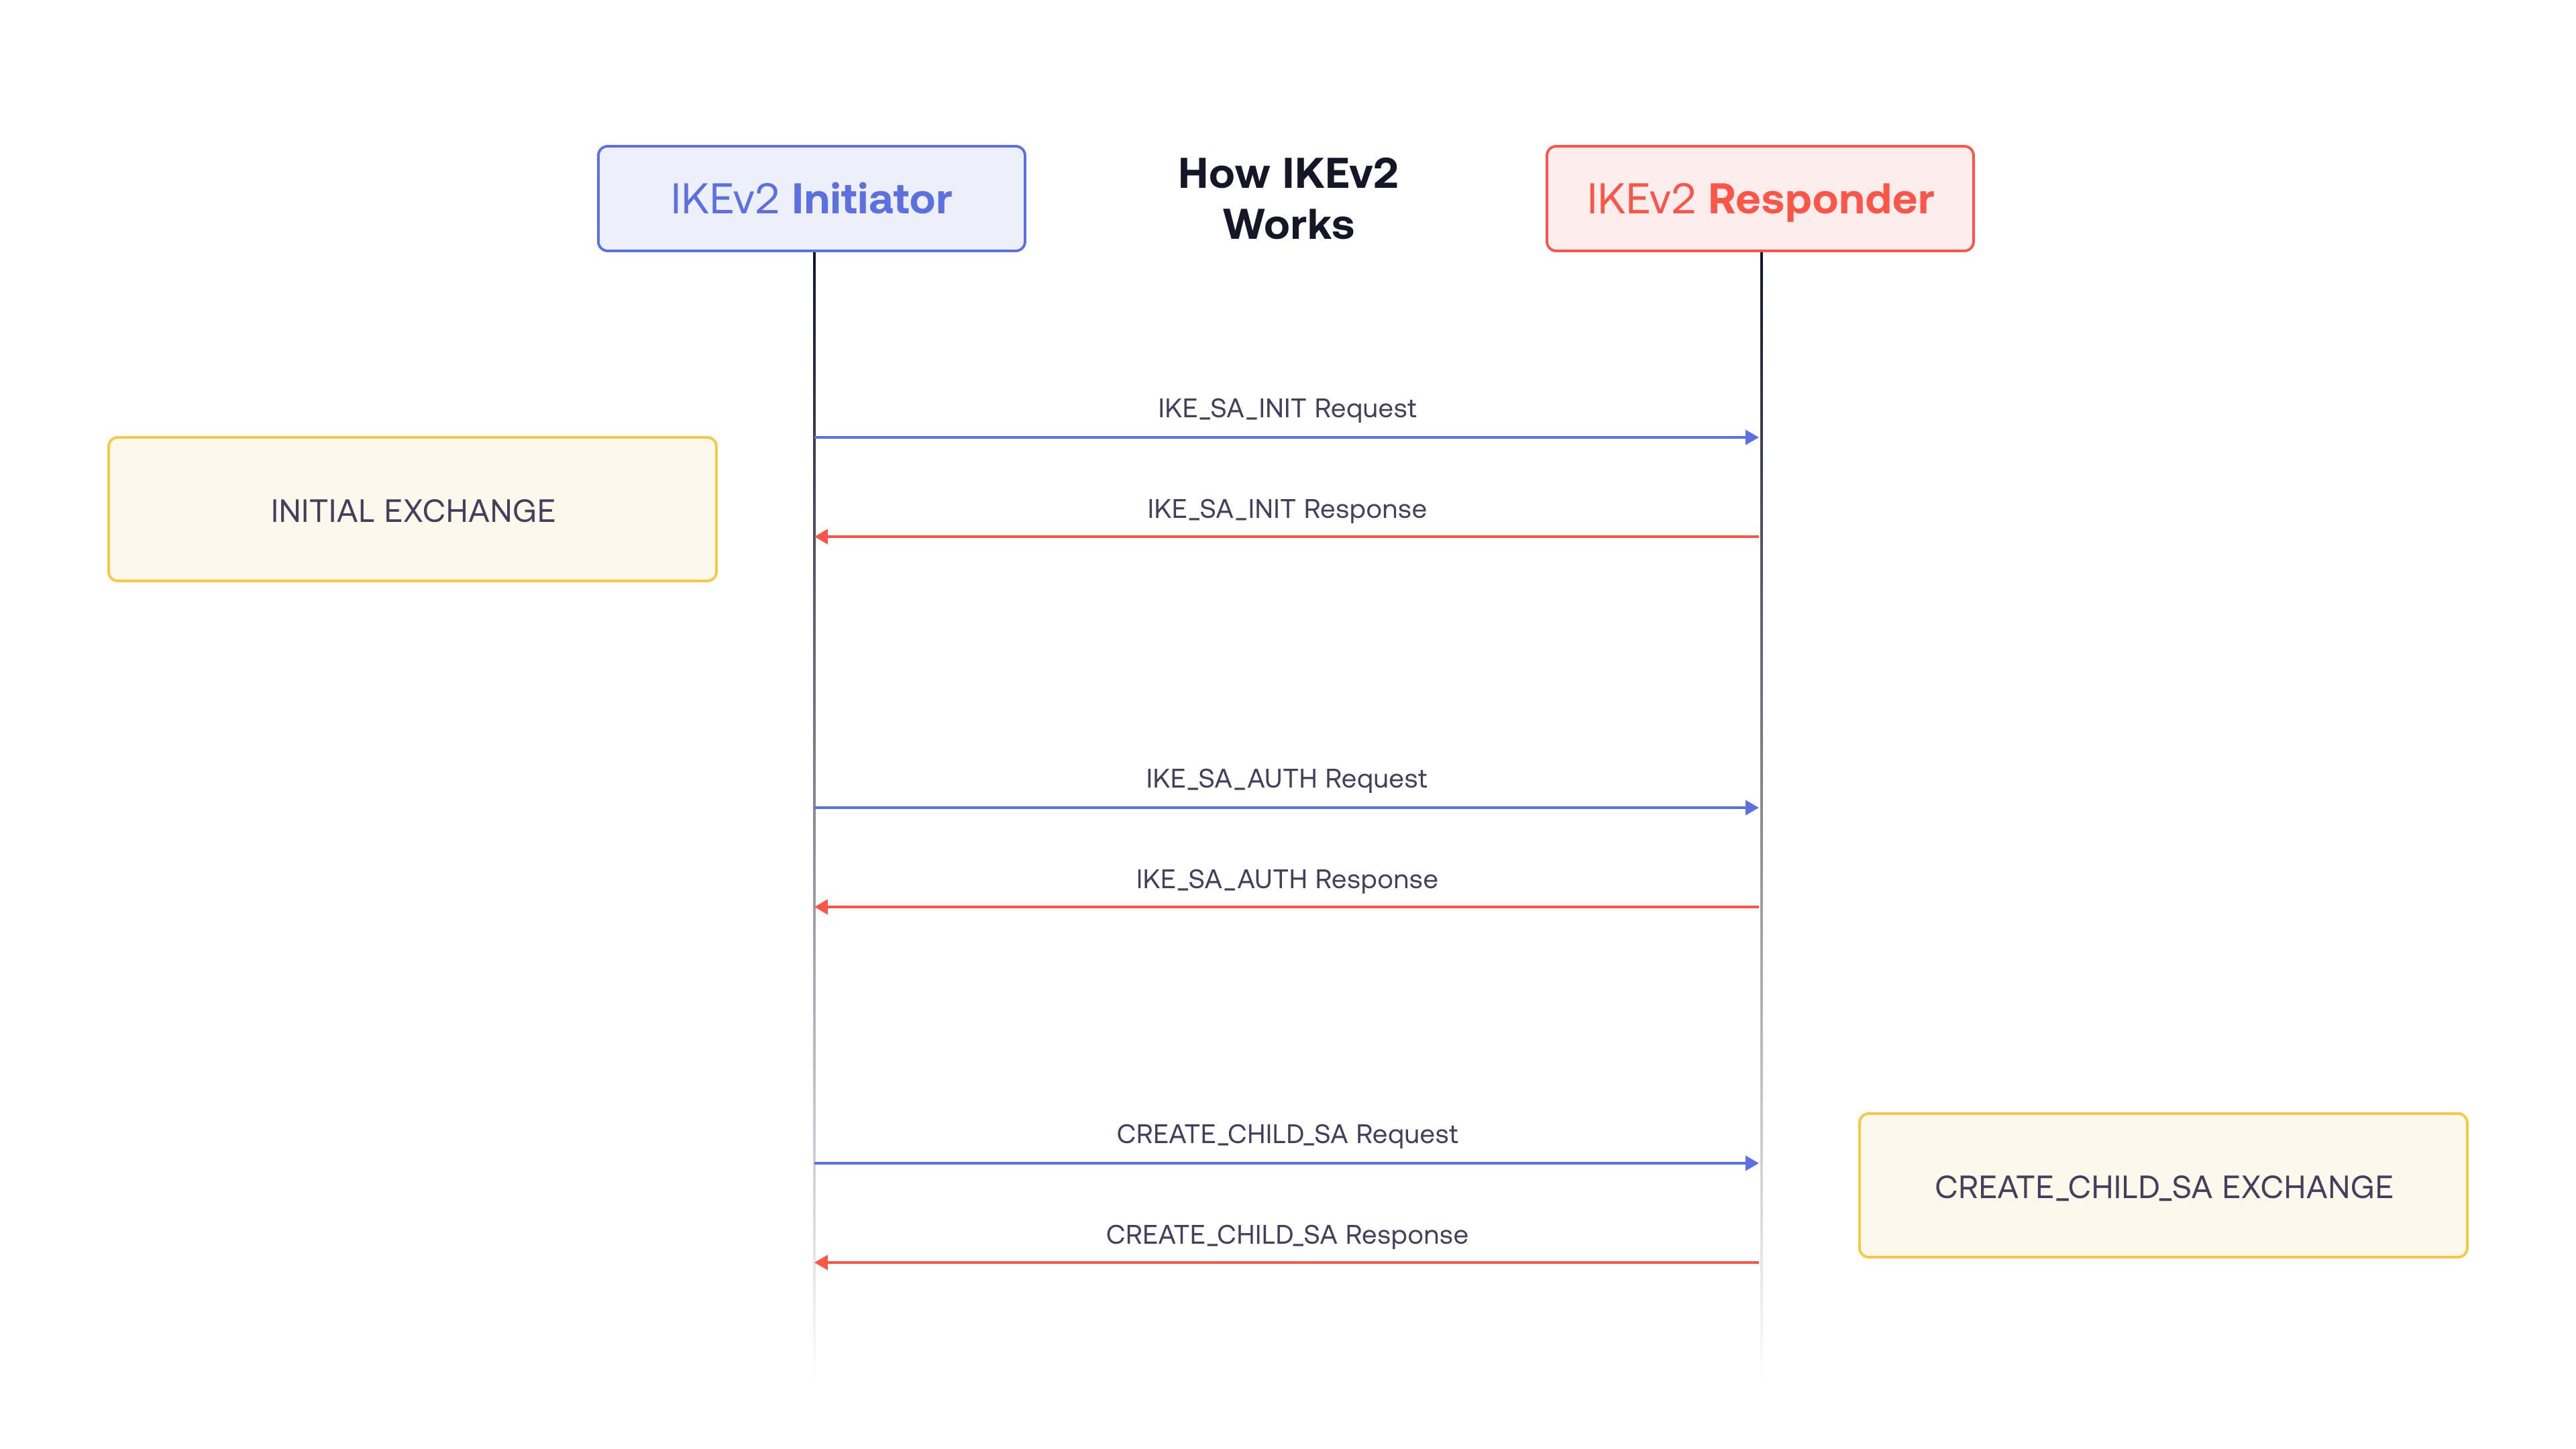
RFC 9370 Summary: Multiple Key Exchanges in IKEv2
Overview
RFC 9370 extends the Internet Key Exchange Version 2 (IKEv2) protocol to facilitate multiple key exchanges during the establishment of a Security Association (SA). This enhancement allows the computation of a final shared secret derived from multiple component key exchange secrets. Key points include:
- Final Shared Secret: The shared secret is computed from all component key exchange secrets.
- Compatibility: If both peers do not support the new exchanges, the final shared secret will match the one specified in RFC 7296.
- Post-Quantum Security: If any component utilizes a quantum-safe algorithm, the resulting shared secret is also post-quantum secure.
Negotiation Methods
There are two primary methods to negotiate additional key exchange algorithms and establish quantum-secure IKE SAs: utilizing IKE_INTERMEDIATE exchanges during the initial Security Association (SA) setup or employing the IKE_FOLLOWUP_KE exchange for subsequent key exchanges. Below is a step-by-step breakdown of each method:
Option 1: Using IKE_INTERMEDIATE Exchanges
- IKE_SA_INIT Negotiation:
- The key exchange method negotiated via Transform Type 4 (ECDH) takes place.
- The initiator includes up to seven newly defined transforms, that represent the extra key exchanges, in the SA payload within the IKE_SA_INIT message.
- The responder selects key exchange methods and returns their IDs in the IKE_SA_INIT response.
- Additional key exchanges are negotiated, leading to one or more IKE_INTERMEDIATE exchanges.
- IKE_INTERMEDIATE Exchanges:
- For each additional key exchange agreed upon, an IKE_INTERMEDIATE exchange is performed.
- The initiator sends key exchange data using the KEi(n) payload, protected with current keys SK_ei/SK_ai.
- The responder responds with the KEr(n) payload, also protected with SK_er/SK_ar.
- Both sides compute updated keying materials from the shared secrets generated during these exchanges.
- IKE_AUTH Exchange:
- After completing IKE_INTERMEDIATE exchanges, the initiator and responder perform the IKE_AUTH exchange, as per the IKEv2 specification.
The shared keying material is completed as follows:
SKEYSEED(n) = prf(SK_d(n-1), SK(n) | Ni | Nr)
Where:
- SK(n) is the shared secret from the current exchange.
- Ni and Nr are nonces from the IKE_SA_INIT exchange.
- SK_d(n-1) is the previously generated SK_d (from IKE_SA_INIT or the last IKE_INTERMEDIATE exchange).
Key materials (SK_d, SK_ai, SK_ar, SK_ei, SK_er, SK_pi, SK_pr) are derived from SKEYSEED(n) using the following formula:
{SK_d(n) | SK_ai(n) | SK_ar(n) | SK_ei(n) | SK_er(n) | SK_pi(n) | SK_pr(n)}
= prf+ (SKEYSEED(n), Ni | Nr | SPIi | SPIr)
Both the initiator and responder use these updated keys in the next IKE_INTERMEDIATE or IKE_AUTH exchange.
[Initiator]                 [Responder]
    |                            |
    | ------ IKE_SA_INIT ------> |
    |                            |
    |<------ IKE_SA_INIT ------> |
    |                            |
    |----- IKE_INTERMEDIATE ---->|
    |                            |
    |<----- IKE_INTERMEDIATE --->|
    |                            |
    |------- IKE_AUTH ---------> |
    |                            |
    |<------- IKE_AUTH --------->|
Option 2: Using IKE_FOLLOWUP_KE Exchanges
- Initial IKE SA Setup:
- An IKE SA is established using the standard IKE_SA_INIT and IKE_AUTH exchanges.
- CREATE_CHILD_SA Exchange:
- The ECDH key exchange negotiated via Transform Type 4 takes place in the CREATE_CHILD_SA exchange, as per the IKEv2 specification [RFC7296].
- The initiator proposes additional key exchanges via ADDKE(Additional Key Exchange) Transform Types in the CREATE_CHILD_SA payload.
- If the responder agrees, additional key exchanges occur in a series of IKE_FOLLOWUP_KE exchanges.
- IKE_FOLLOWUP_KE Exchanges:
- Similar to the first option, but here additional key exchanges occur directly after the CREATE_CHILD_SA exchange.
- Cryptographic parameters for ADDKE are exchanged. The exchange is protected with keys established through the CREATE_CHILD_SA exchange.
After the exchanges, both peers compute updated keying materials as follows:
For IKE SA rekey:
SKEYSEED = prf(SK_d, SK(0) | Ni | Nr | SK(1) | ... | SK(n))
- SK_d is from the existing IKE SA.
- SK(0), Ni, and Nr are the shared key and nonces from the CREATE_CHILD_SA exchange.
- SK(1)…SK(n) are shared keys from additional key exchanges.
For Child SA creation or rekey:
KEYMAT = prf+ (SK_d, SK(0) | Ni | Nr | SK(1) | ... | SK(n))
In both cases, SK_d comes from the existing IKE SA, and the keying material is derived from SK(0), Ni, Nr, and additional shared keys.
[Initiator]                 [Responder]
    |                            |
    | ------ IKE_SA_INIT ------> |
    |                            |
    |<------ IKE_SA_INIT ------> |
    |                            |
    |------ IKE_AUTH ----------> |
    |                            |
    |<------ IKE_AUTH ---------->|
    |                            |
    |---- CREATE_CHILD_SA -----> |
    |                            |
    |<---- CREATE_CHILD_SA ----->|
    |                            |
    |--- IKE_FOLLOWUP_KE ------> |
    |                            |
    |<--- IKE_FOLLOWUP_KE ------>|
Choosing the Method
The choice between using IKE_INTERMEDIATE or IKE_FOLLOWUP_KE exchanges depends on the peers’ security policies. If the initial Child SA must be quantum secure, negotiating additional key exchanges through IKE_INTERMEDIATE exchanges may be preferable.
BLAST Integration in IKEv2
Qrypt solution leverages RFC9370 specification that describes a method to perform multiple successive key exchanges in IKEv2. Qrypt keys are generated independently on each endpoint, however, to establish the same set of keys, parties must exchange the associated key metadata. Additional IKEv2 key exchanges are used to exchange the metadata.
The BLAST Protocol
BLAST is the protocol used to eliminate key transmission and safeguard data against the Harvest Now Decrypt Later (HNDL) attack.
- The BLAST architecture enables generation of identical keys at multiple endpoints, so they are never distributed.
- Caches of random allow for sampling by multiple clients – with time and usage controls that trigger cache shredding.
- Client locally extracts keys from returned random – not even Qrypt can determine the keys.
- No dedicated channels or infrastructure required – unlike quantum key distribution (QKD).
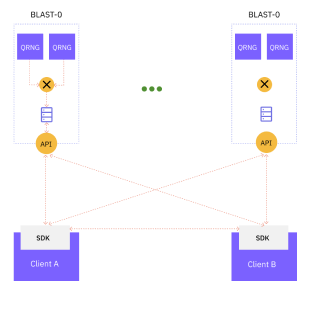
Walk-through
- Client A determines the key generation requirements: BLAST servers to be used, the sampling seeds, and extraction parameters
- Clients share the key generation requirements – seeds, extraction parameters.
- Each client independently samples BLAST APIs, assembling identical blocks of random on each client.
- Clients locally extracts keys - resulting in identical encryption keys which were never distributed.
For more information see BLAST
BLAST Key Exchange in IKEv2
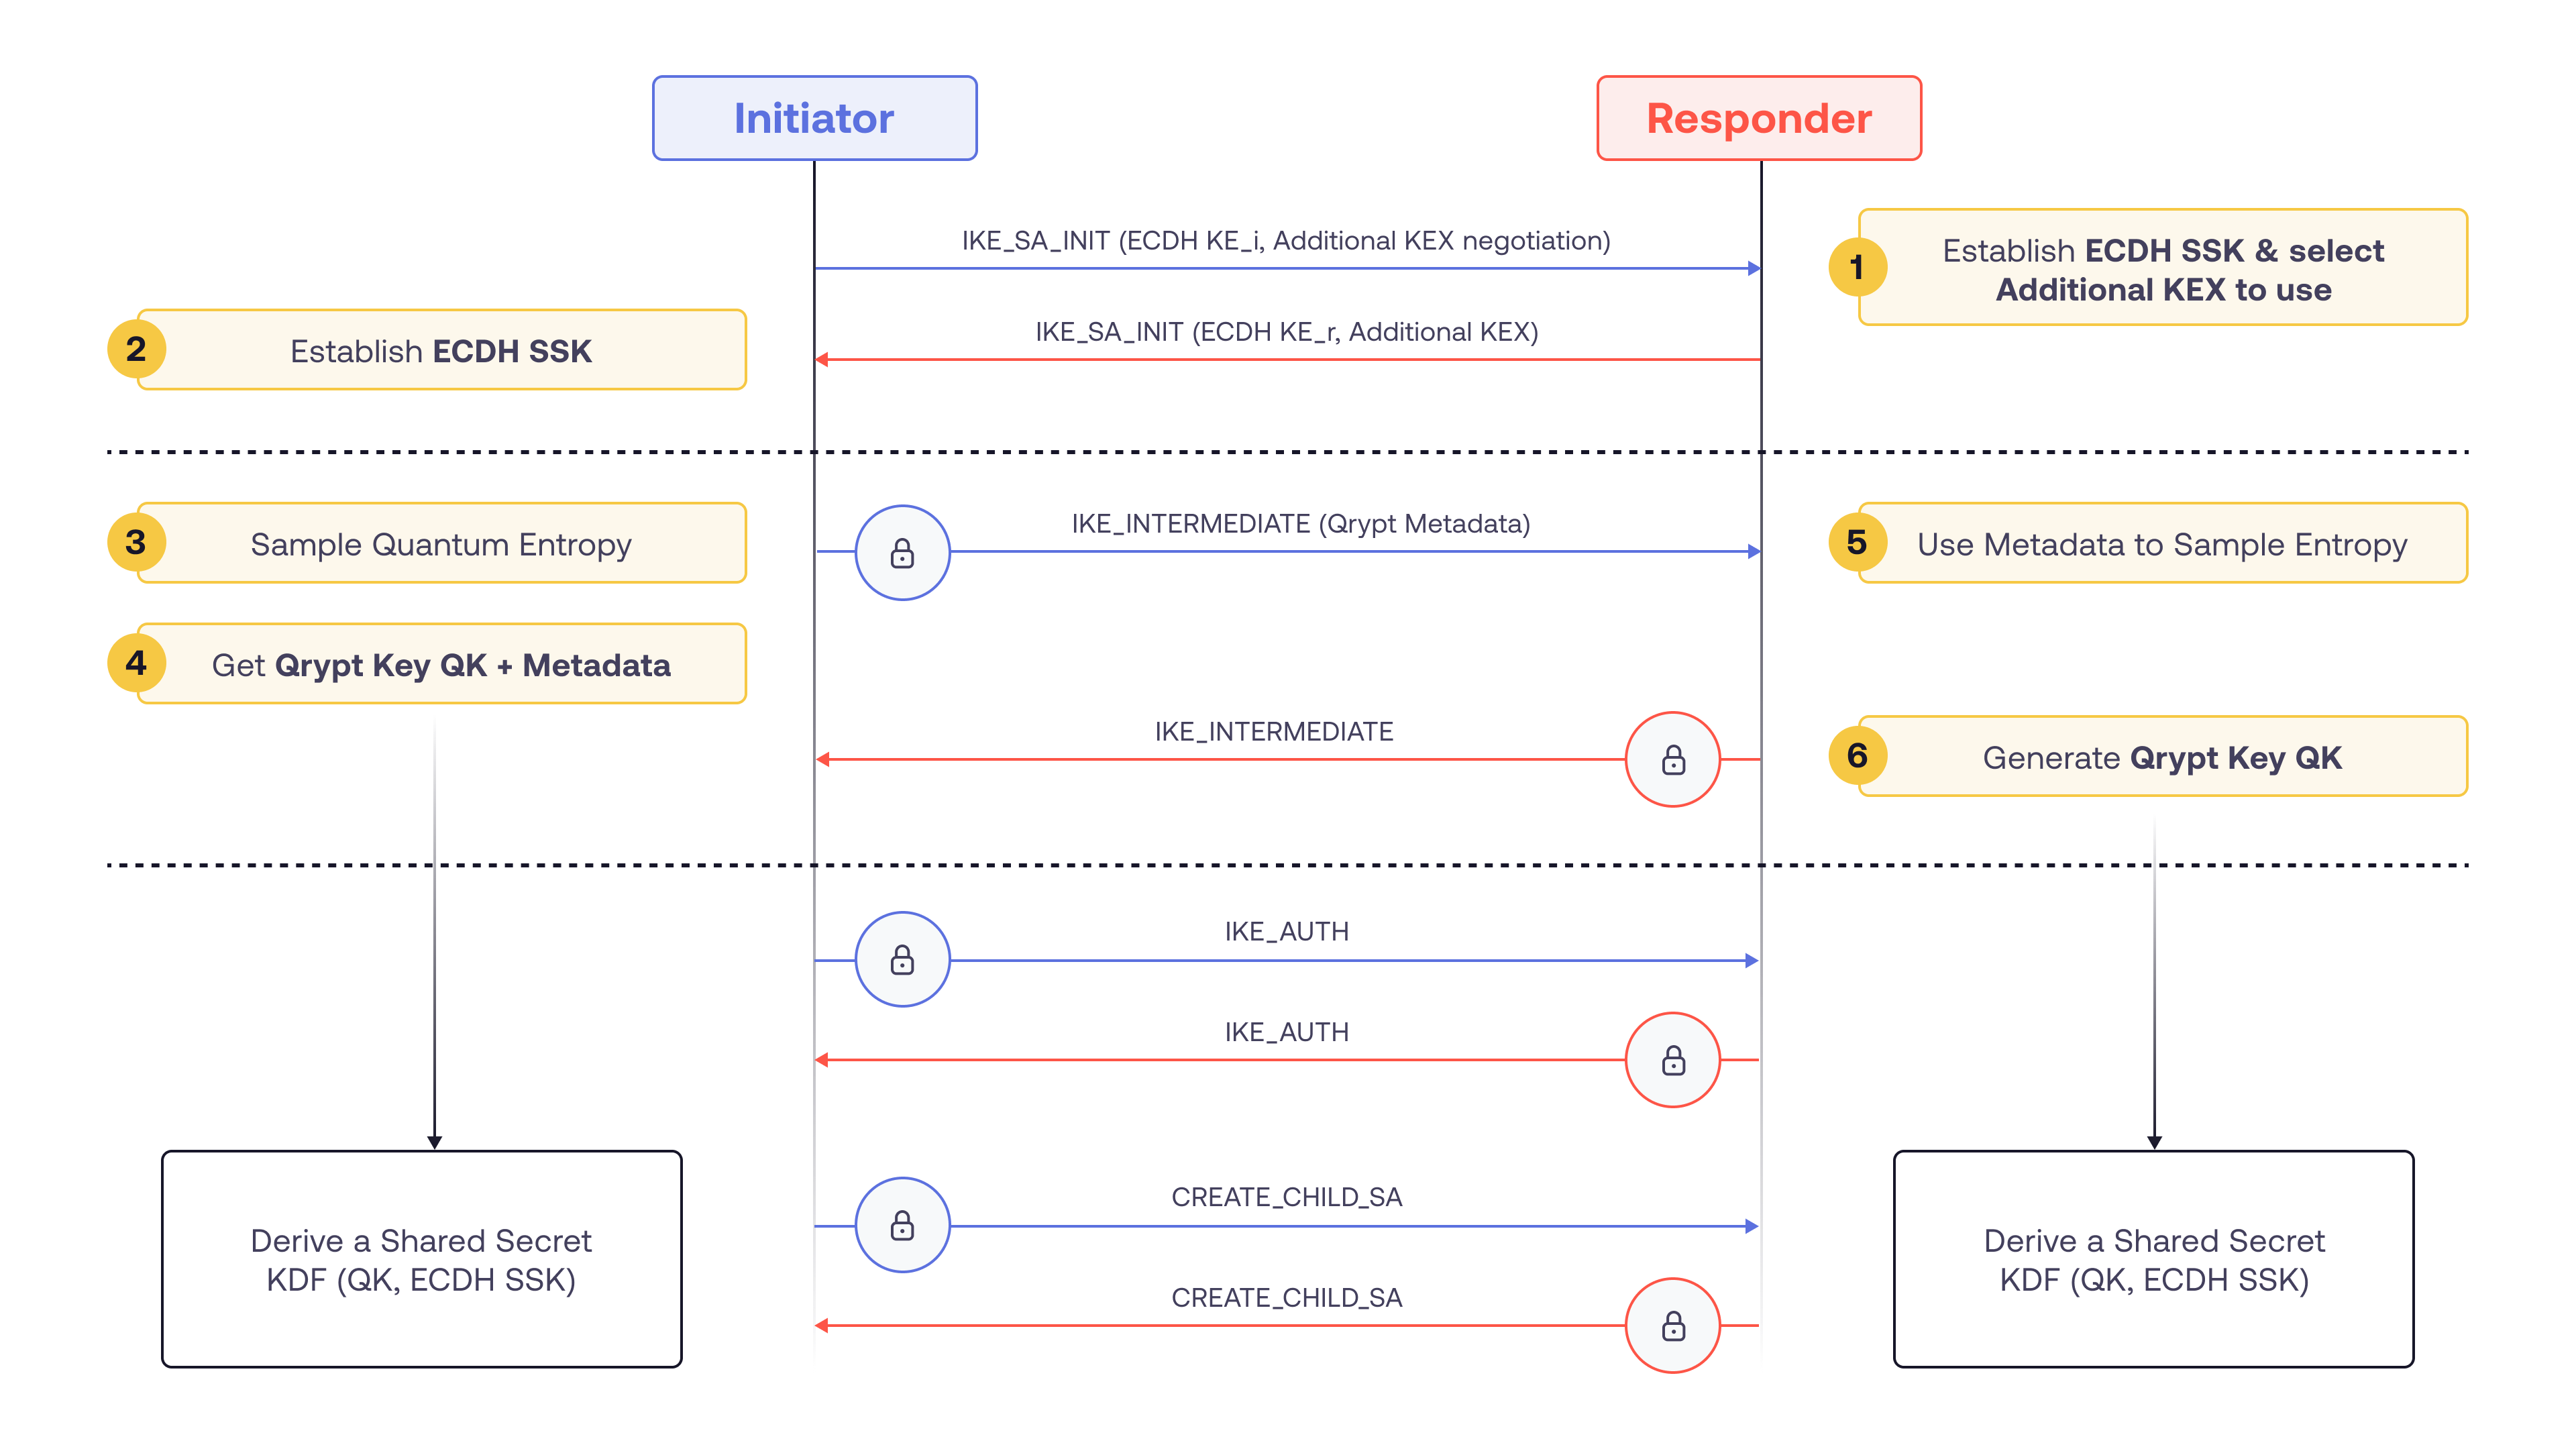
Option 1: Using IKE_INTERMEDIATE
- IKE_SA_INIT messages are used to negotiate the BLAST key exchange and establish ECDH SSK (shared secret key)
- The initiator uses BLAST SDK to generate Qrypt key (QK) and the associated metadata
- The metadata is transmitted in the IKE_INTERMEDIATE message, encrypted using keys established in the previous step
- The responder uses BLAST SDK to generate the same QK from the received metadata
- QK and ECDH SSK are used to derive encryption and authentication keys as per RFC9370
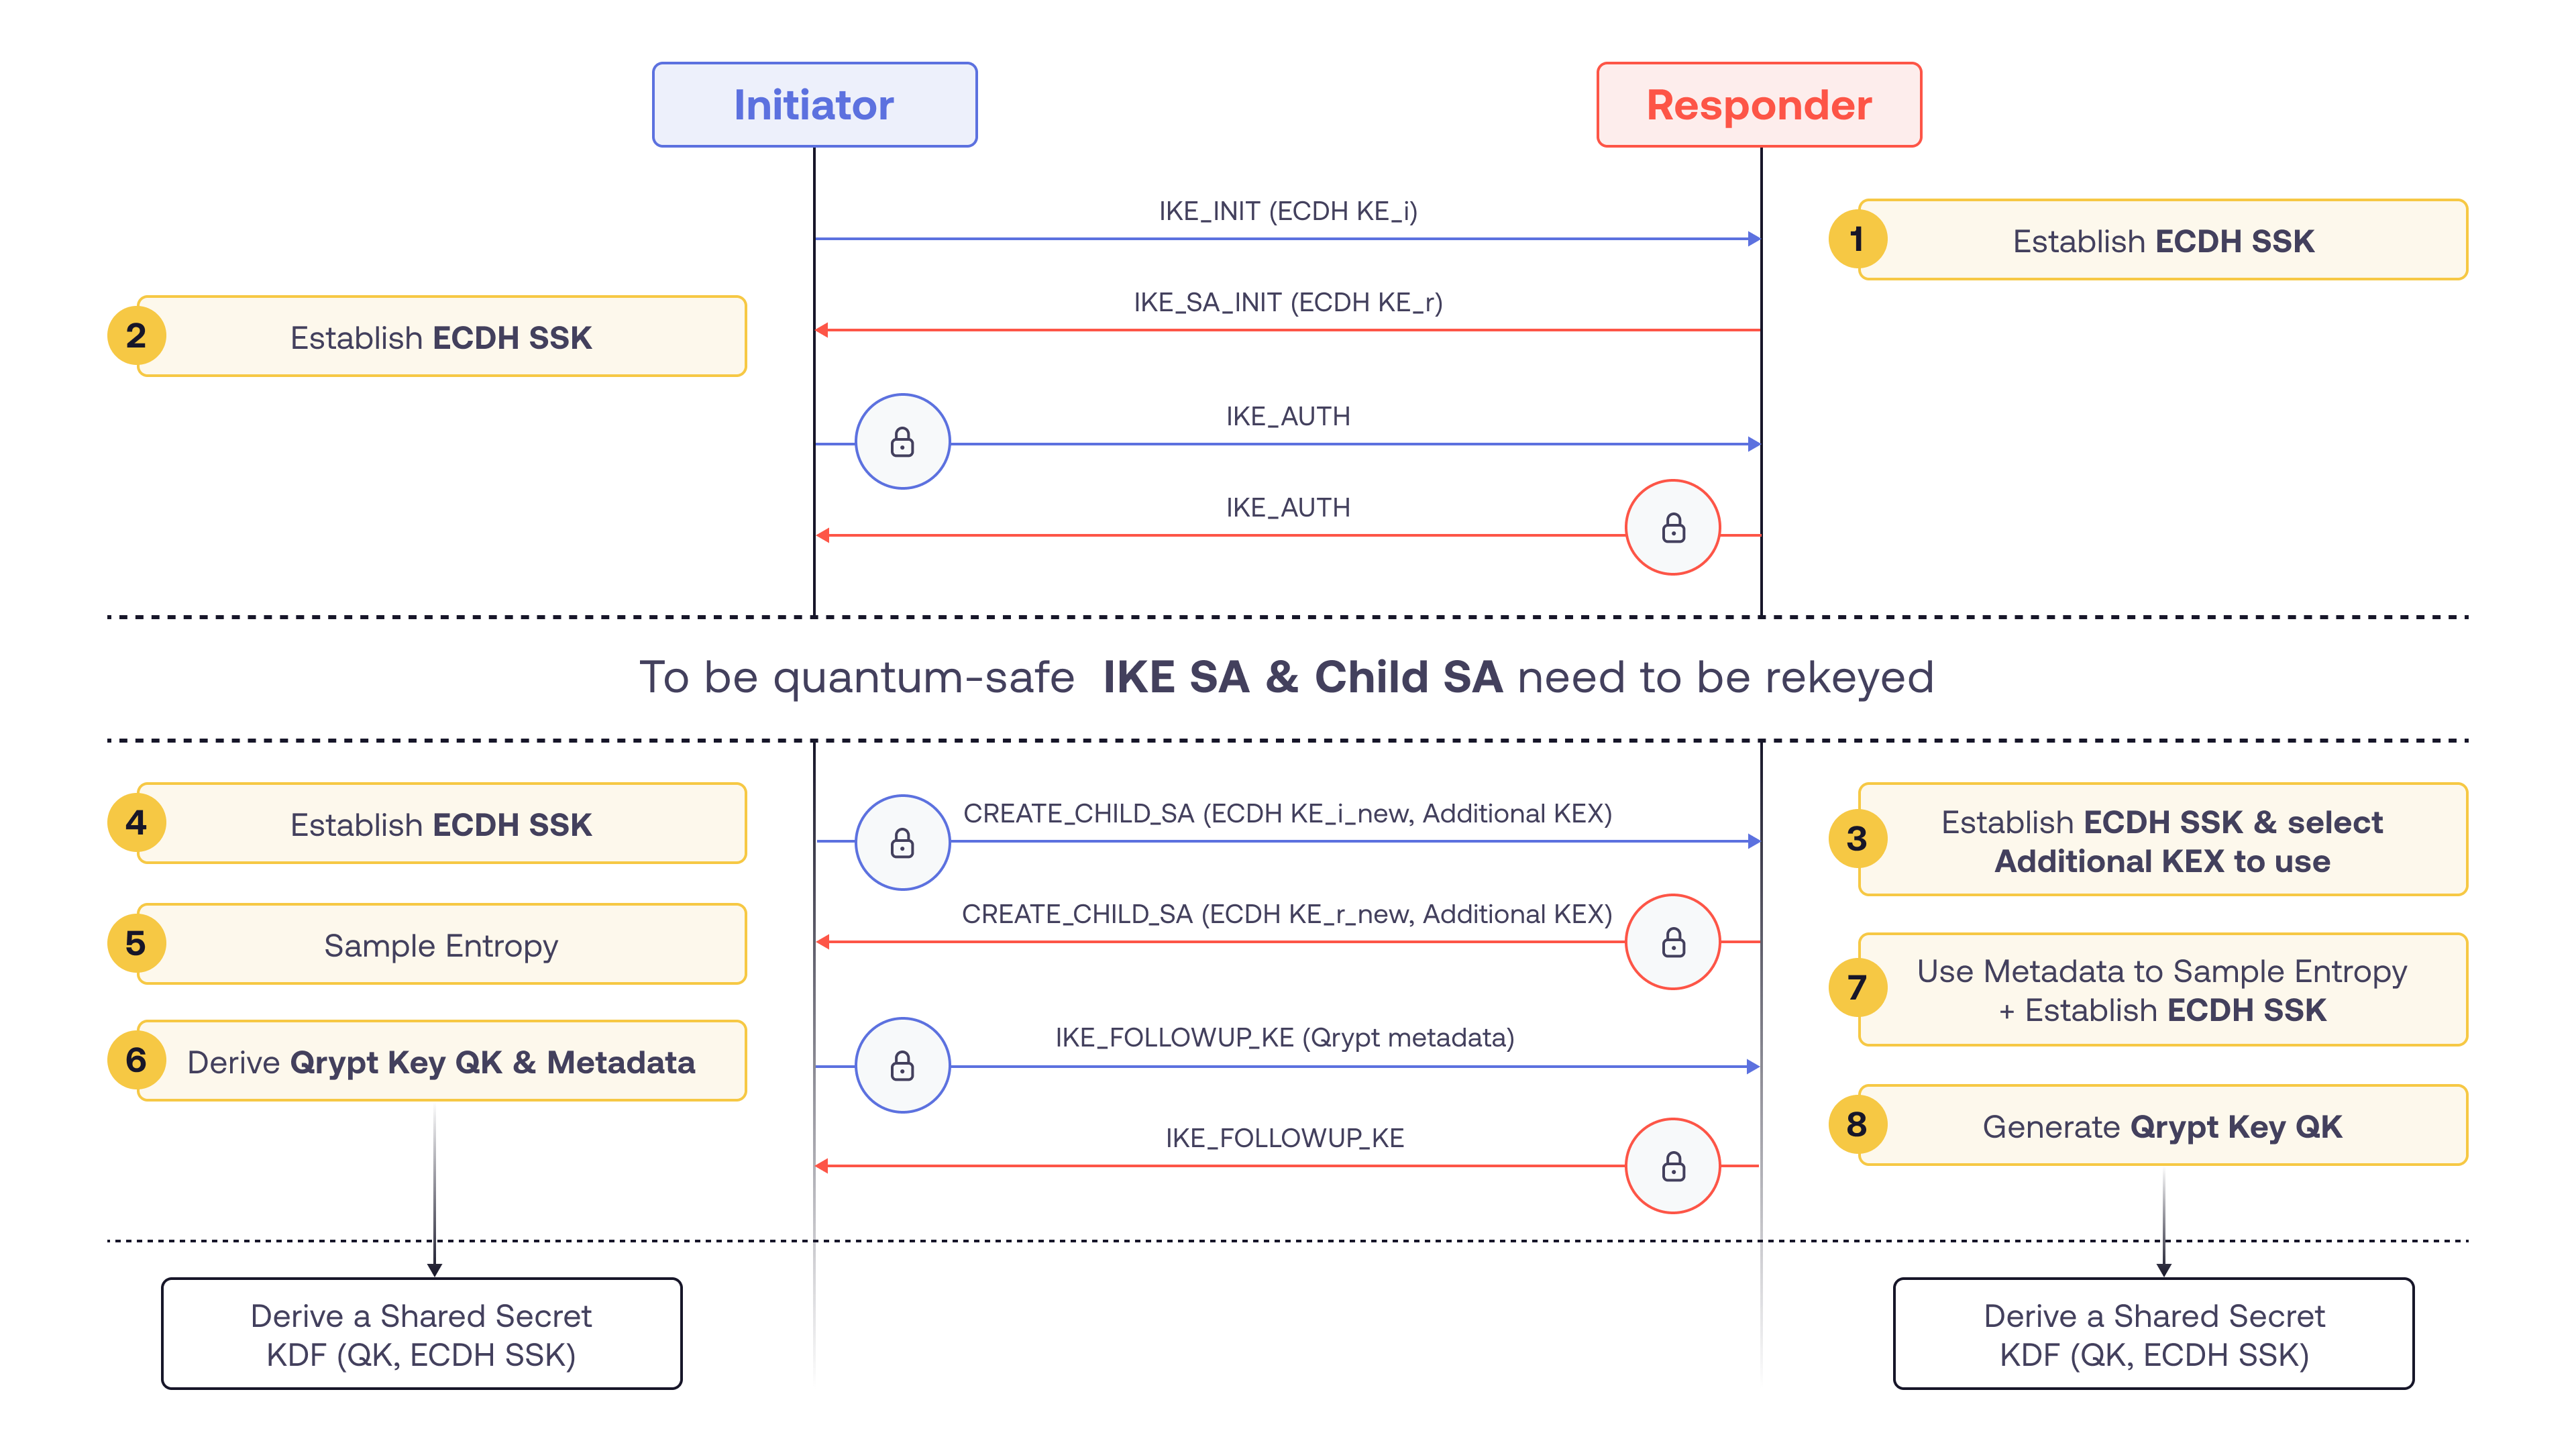
Option 2: Using IKE_FOLLOWUP_KE
- An IKE SA is established using the standard IKE_SA_INIT and IKE_AUTH exchanges.
- The initiator proposes BLAST key exchange via ADDKE(Additional Key Exchange) Transform Types in the CREATE_CHILD_SA payload.
- The initiator uses BLAST SDK to generate Qrypt key (QK) and the associated metadata
- Exchange of the metadata occur directly after the CREATE_CHILD_SA exchange. The exchange is protected with keys established through the CREATE_CHILD_SA exchange.
- The responder uses BLAST SDK to generate the same QK from the received metadata
- QK and ECDH SSK are used to derive encryption and authentication keys as per RFC9370
NVIDIA Quantum Secure Gateway Architecture
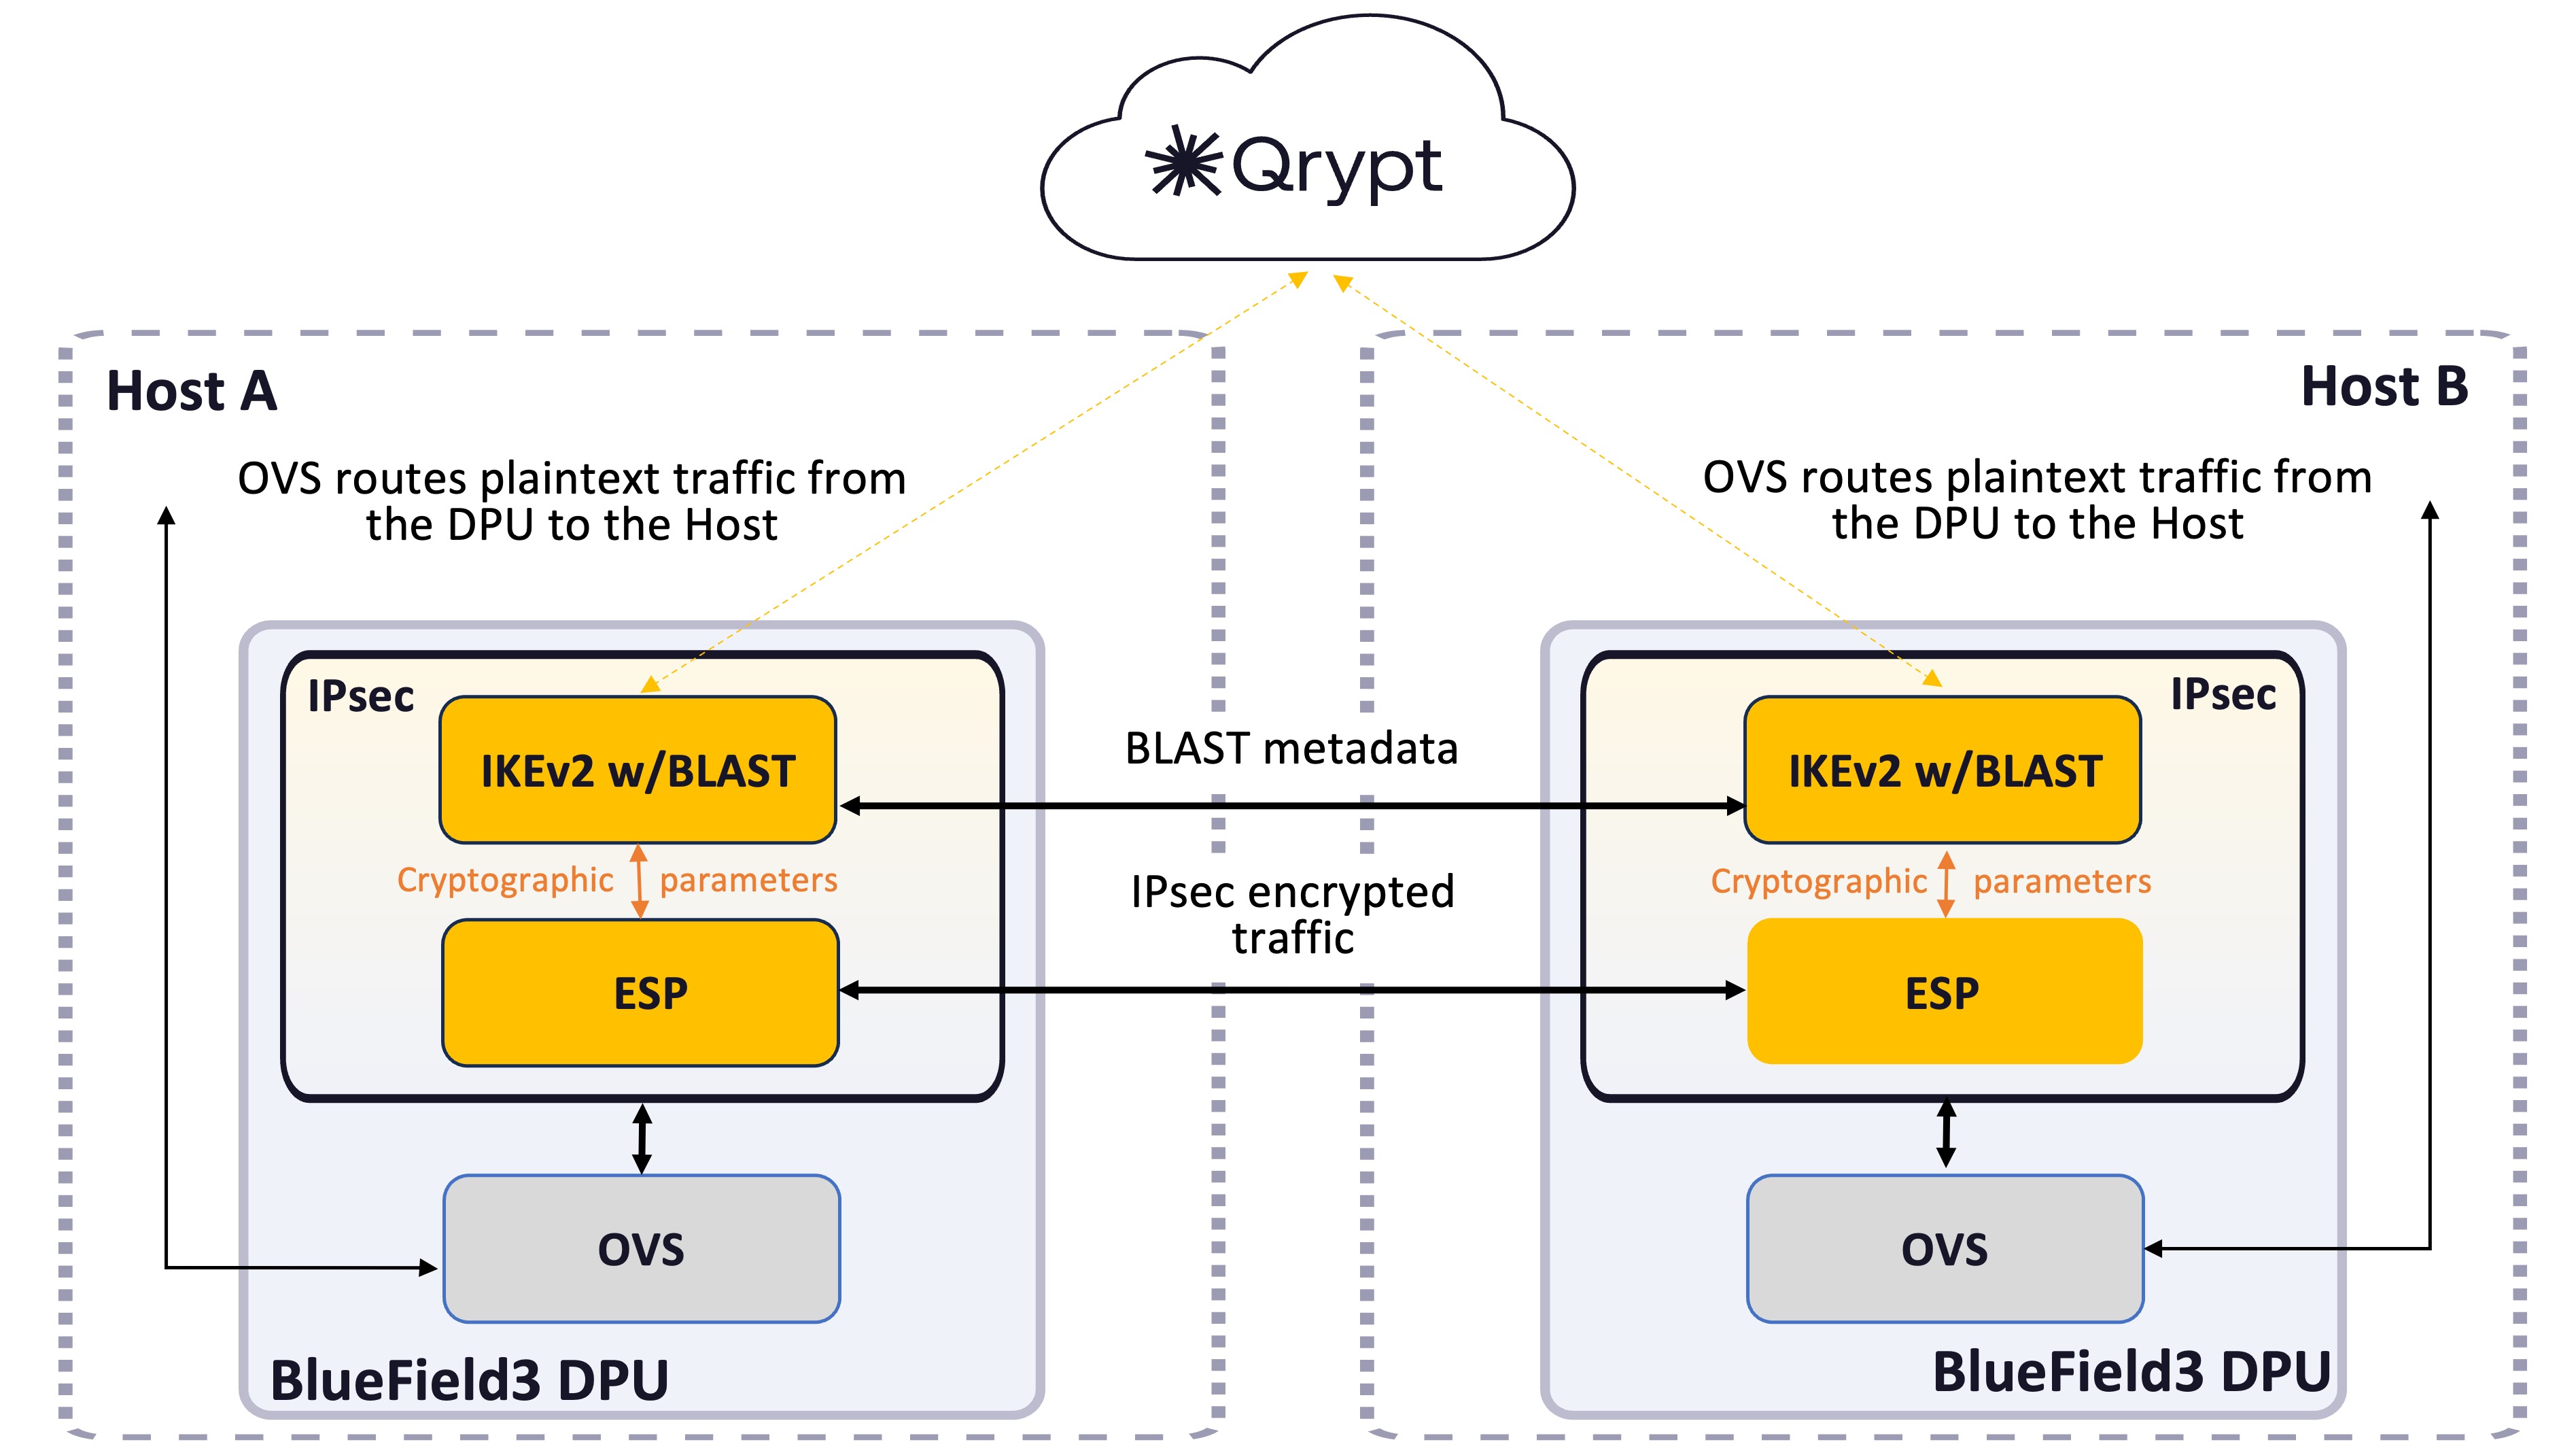
The process starts with IKEv2 negotiating Security Associations (SAs) between the initiator and responder, defining cryptographic parameters like algorithms and key lengths. An SA is uniquely identified by a triplet, which consists of the security parameter index (SPI), destination IP address, and security protocol identifier. An SPI is a 32-bit number. It is transmitted in the AH/ESP header. In IPsec, ESP uses these SAs to secure IP packets by referencing the Security Parameter Index (SPI) to identify the correct SA for each packet.
Association of ESP with Security Associations (SAs)
-
SA Establishment: During the IKEv2 negotiation, strongSwan establishes SAs between peers, assigning a unique SPI to each SA. This SPI serves as an identifier for the SA’s cryptographic parameters.
-
Packet Processing: As ESP processes incoming packets, it examines the SPI in each packet’s header. Using this SPI, ESP retrieves the corresponding SA from the Security Association Database (SAD) to apply the correct cryptographic operations.
How ESP Identifies the Appropriate SA
-
Receiving a Packet: When an IP packet arrives, ESP examines the SPI value in the packet’s header.
-
SA Lookup: Using the SPI, ESP searches its Security Association Database (SAD) to find the corresponding SA that matches the SPI. The SAD contains entries for each active SA, indexed by their SPIs.
-
Applying Security Parameters: Once the matching SA is identified, ESP retrieves the cryptographic parameters (such as encryption and authentication algorithms) associated with that SA. It then processes the packet accordingly to ensure data confidentiality and integrity.
Open vSwitch (OVS)
OVS is used to facilitate the transfer of plaintext messages between the host and the DPU. In this context, OVS acts as a software-based network switch that manages network traffic, routing messages between the host’s CPU and the DPU without encryption.
Setup East-West Overlay Encryption
To set up east-west overlay encryption, first ensure that the strongSwan is built on the target machine. Next, complete the following two steps:
-
Configure the OVS (Open vSwitch):
- Setup the OVS bridge
- Configure the authentication method
-
Run the script: Execute the following command, which runs the ovs-monitor-ipsec script and automates the configuration process:
systemctl start openvswitch-ipsec.service
Configuring the OVS
Set up OVS bridges in both hosts
-
Start Open vSwitch. If your operating system is Ubuntu, run the following on both Arm_1 and Arm_2:
service openvswitch-switch start -
Start OVS IPsec service. Run the following on both Arm_1 and Arm_2:
systemctl start openvswitch-ipsec.service -
Before you can set up OVS bridges in both DPUs, and add the physical function (PF) or its associated representor (PF_REP) to a new bridge, they must be detached from any existing OVS bridge they are associated with.
Detach PF_REP and PF from their current bridge:
sudo ovs-vsctl del-port ovsbr1 $PF_REP
sudo ovs-vsctl del-port ovsbr1 $PF
Note that “ovsbr1” is a sample name given in these instructions; the name on your system could be different.
Next, run the following on both Arm_1 and Arm_2:
sudo ovs-vsctl add-br my-ovs-br
sudo ovs-vsctl add-port my-ovs-br $PF_REP
sudo ovs-vsctl add-port my-ovs-br $PF
sudo ovs-vsctl set Open_vSwitch . other_config:hw-offload=true
If your operating system is CentOS, run the following on both Arm_1 and Arm_2:
service openvswitch restart -
Set up IPsec tunnel on the OVS bridge. Three authentication methods are possible. Select your preferred method and follow the steps relevant to it. Note that some authentication methods require you to create certificates (self-signed or certificate authority certificates).
Authentication Methods
There are three authentication methods:
Using pre-shared key
On Arm_1, run:
ovs-vsctl add-port vxlan-br tun -- \
            set interface tun type=vxlan \
                          options:local_ip=$ip1 \
                          options:remote_ip=$ip2 \
                          options:key=100 \
                          options:dst_port=4789 \
                          options:psk= your pre-shared secret value
On Arm_2, run:
sudo ovs-vsctl add-port vxlan-br tun -- \
            set interface tun type=vxlan \
                          options:local_ip=$ip2 \
                          options:remote_ip=$ip1 \
                          options:key=100 \
                          options:dst_port=4789\
                          options:psk=your pre-shared secret value
Pre-shared key (PSK) based authentication is easy to set up but less secure compared with other authentication methods. You should use it cautiously in production systems.
Using self-signed certificates
Generate self-signed certificate in both Arm_1and Arm_2. Then copy the certificate of Arm_1 to Arm_2 and the certificate of Arm_2 to Arm_1.
On Arm_1, run:
Generate self-signed certificates
sudo ovs-pki req -u host_1.
sudo ovs-pki self-sign host_1
sudo ovs-vsctl set Open_vSwitch . other_config:certificate=/etc/swanctl/x509/host_1-cert.pem \
  other_config:private_key=/etc/swanctl/private/host_1-privkey.pem
On Arm_2, run:
Generate self-signed certificates
sudo ovs-pki req -u host_2.
sudo ovs-pki self-sign host_2
sudo ovs-vsctl set Open_vSwitch . other_config:certificate=/etc/swanctl/x509/host_2-cert.pem \
  other_config:private_key=/etc/swanctl/private/host_2-privkey.pem
- Copy the certificate of Arm_1 to Arm_2, and the certificate of Arm_2 to Arm_1.
- On each machine, move both host_1-privkey.pem and host_2-cert.pem to /etc/swanctl/x509/ if on Ubuntu, or /etc/strongswan/swanctl/x509/ if on CentOS.
- On each machine, move the local private key (host_1-privkey.pem on Arm_1 and host_2-privkey.pem on Arm_2) to /etc/swanctl/private if on Ubuntu, or /etc/strongswan/swanctl/private if on CentOS.
Using CA-signed certificate:
First you need to establish a public key infrastructure (PKI), generate certificate requests, and copy the certificate request of Arm_1 to Arm_2 and Arm_2 to Arm_1 . Sign the certificate requests with the CA key.
On Arm_1, run:
sudo ovs-pki init --force
cp /var/lib/openvswitch/pki/controllerca/cacert.pem <path_to>/certsworkspace
cd <path_to>/certsworkspace
sudo ovs-pki req -u host_1
sudo ovs-pki sign host1 switch
After running this code, you should have host_1-cert.pem, host_1-privkey.pem, and cacert.pm in the certsworkspace folder.
On Arm_2, run:
sudo ovs-pki init --force
cp /var/lib/openvswitch/pki/controllerca/cacert.pem <path_to>/certsworkspace
cd <path_to>/certsworkspace
sudo ovs-pki req -u host_2
sudo ovs-pki sign host_2 switch
After running this code, you should have host_2-cert.pem, host_2-privkey.pem, and cacert.pm in the certsworkspace folder.
- Copy the certificate of Arm_1 to Arm_2 and the certificate of Arm_2 to Arm_1.
- On each machine, move both host_1-privkey.pem and host_2-cert.pem to /etc/swanctl/x509/ if on Ubuntu, or /etc/strongswan/swanctl/x509/ if on CentOS.
- On each machine, move the local private key (host_1-privkey.pem if on Arm_1 and host_2-privkey.pem if on Arm_2) to /etc/swanctl/private if on Ubuntu, or /etc/strongswan/swanctl/private if on CentOS.
- On each machine, copy cacert.pem to the x509ca directory under /etc/swanctl/x509ca/ if on Ubuntu, or /etc/strongswan/swanctl/x509ca/ if on CentOS.
Configure IPsec tunnel to use CA-signed certificate:
On Arm_1, run:
 sudo ovs-vsctl set Open_vSwitch . \
        other_config:certificate=/etc/strongswan/swanctl/x509/host_1.pem \
        other_config:private_key=/etc/strongswan/swanctl/private/host_1-privkey.pem \
        other_config:ca_cert=/etc/strongswan/swanctl/x509ca/cacert.pem
On Arm_2, run:
 sudo ovs-vsctl set Open_vSwitch . \
        other_config:certificate=/etc/strongswan/swanctl/x509/host_2.pem \
        other_config:private_key=/etc/strongswan/swanctl/private/host_2-privkey.pem \
        other_config:ca_cert=/etc/strongswan/swanctl/x509ca/cacert.pem
Execute a script
Ensure that the strongSwan has already been built on your system.
After OVS is configured, run the following command:
systemctl start openvswitch-ipsec.service
This command automatically runs the ovs-monitor-ipsec script and generates the swanctl.conf file. This command also runs the strongSwan IPsec service.
Script Parameters
Note that critical information such as key exchange and authentication algorithms to be used for IKE SA and ESP SA are passed in the ovs-monitor-ipsec script to later generate a swanctl.conf file. Ensure that the script contains all the key exchange algorithms to be used for IKE SA establishment. For instance, parameters ke1_kyber3-ke2_blast passed in the ovs-monitor-ipsec script
sudo sed -i 's/aes256gcm16-modp2048-esn/aes256gcm16-modp2048-ke1_kyber3-ke2_blast-esn/g' /usr/share/openvswitch/scripts/ovs-monitor-ipsec
will result in swanctl.conf parameters:
esp_proposals = aes128gcm128-x25519-ke1_kyber3-ke2_blast
strongSwan configuration file
Here’s a basic structure for the swanctl.conf file that includes necessary parameters for both ends of the connection (referred to as Left (BFL) and Right (BFR)):
conn-defaults {
      unique = replace
      reauth_time = 0
      version = 2
      mobike = no
      proposals = aes128-sha256-x25519
}

child-defaults {
      esp_proposals = aes256gcm16-modp2048-ke1_kyber3-ke2_blast-esn
      mode = transport
      policies_fwd_out = yes
      start_action = start
}

connections {
    tun-1 : conn-defaults{
        local_addrs  = 0.0.0.0/0
        remote_addrs = 192.168.50.2

        local {
            auth = psk
            id = 192.168.50.1
         }
         remote {
            auth = psk
            id = 192.168.50.2
         }

   children {
            tun-in-1 : child-defaults {
                local_ts = 192.168.50.1/32 [udp/4789]
                remote_ts = 192.168.50.2/32 [udp]
                hw_offload = auto (should be full if supported)
            }
            tun-out-1 : child-defaults {
                local_ts = 192.168.50.1/32 [udp]
                remote_ts = 192.168.50.2/32 [udp/4789]
                hw_offload = auto (should be full if supported)
            }
        }
    }
}

secrets {
        ike-tun {
            id = 192.168.50.1
            secret = YOUR PRE-SHARED SECRET
        }
}
If using pre-shared key (PSK) for authentication, add a section to the swanctl.conf file:
secrets {
ike-BF {
        id-host1 = host1                       // Identifier for Left Arm
        id-host2 = host2                       // Identifier for Right Arm
        secret = YOUR PRE-SHARED SECRET  // Replace with your actual secret
    }
}
Ensure that all the data needed to generate the swanctl.conf file is correctly passed in the ovs-monitor-ipsec script.
For more information see NVIDIA DOCA East-West Overlay Encryption Application
Build strongSwan with liboqs and Qrypt’s BLAST plugin
Ensure that cmake is installed before completing the steps below.
Create a directory to clone the repos into
mkdir qrypt
cd qrypt
Clone and build liboqs
sudo apt -y install astyle cmake gcc ninja-build libssl-dev python3-pytest python3-pytest-xdist unzip xsltproc doxygen graphviz python3-yaml valgrind

git clone -b main https://github.com/open-quantum-safe/liboqs.git
cd liboqs

mkdir build
cd build
cmake -GNinja -DOQS_USE_OPENSSL=ON -DBUILD_SHARED_LIBS=ON -DCMAKE_INSTALL_PREFIX=/usr \
              -DCMAKE_BUILD_TYPE=Release -DOQS_BUILD_ONLY_LIB=ON ..
ninja
sudo ninja install
Clone the strongSwan repo
git clone https://github.com/QryptInc/strongswan.git
cd strongswan
git checkout BF-6.0.0beta4-qrypt-plugins
Edit the plugin conf files
PLease contact us to obtain the JSON web token (JWT) that you’ll need to add to the conf files.
strongswan/src/libstrongswan/plugins/quantum_entropy/quantum-entropy.conf:
quantum_entropy {
    // Entropy API FQDN
    fqdn = api-eus.qrypt.com

    // Entropy API JWT
    jwt = <PASTE-TOKEN-HERE>

    // File to read local random bytes for xor with downloaded entropy
    random = /dev/random

    // Whether to load the plugin. Can also be an integer to increase the
    // priority of this plugin.
    load = yes
}
strongswan/src/libstrongswan/plugins/blast/blast.conf:
blast {

    jwt = <PASTE-TOKEN-HERE>

    load = yes

}
Build strongSwan
Building a strongSwan 6.X tag will include support for RFC 9370 which will allow for hybrid key exchanges including PQC and BLAST.
sudo apt-get -y install pkg-config shtool autoconf gperf bison build-essential pkg-config m4 libtool libgmp3-dev automake autoconf gettext perl flex libsystemd-dev libjansson-dev curl libcurl4-openssl-dev

./autogen.sh
./configure --enable-openssl --disable-random --prefix=/usr/local --sysconfdir=/etc --enable-systemd --enable-oqs --enable-curl
make
sudo make install
Build Qrypt’s BLAST plugin
You should have Qrypt Security libraries, provided directly by Qrypt, along with instructions to build the BLAST IPsec plugin. Please follow the steps outlined in that document to build the plugin.
Start and stop service
sudo systemctl daemon-reload
sudo systemctl stop strongswan.service
sudo systemctl start strongswan.service
sudo systemctl status strongswan.service